Guides - Upgrade the Linode CLI to use Python 3
Access the entire Linode platform from the command line, easily adding, removing, or modifying services.
In This Guide
At the time of this writing, the Linode CLI is currently able to be fully supported by both Python 2.x and Python 3.x depending on user preference and needs. That being said, as Python 2 has reached it’s end-of-life in early 2020, it is strongly recommended that users upgrade to the latest version of the CLI supported by python3 as soon as they are able.
In this guide, steps are provided to uninstall the version of the Linode CLI that relies on Python 2, and immediately replace it with the version of the Linode CLI built with Python 3.
Uninstalling the Python 2 CLI
Before proceeding, users should first uninstall the Python 2 based version of the Linode CLI from their Linode using python 2’s package manager pip:
sudo pip uninstall linode-cliWhile uninstalling, you may be prompted to agree to the removal of some configuration files. Select Y to proceed and complete the removal process.
Installing the Python 3 Linode CLI
The upgrade path for the Python 3 Linode CLI depends on the Distro and package manager that you’re using.
Ubuntu/Debian
Ensure that all available packages are up to date:
sudo apt updateInstall python3 and pip3:
sudo apt install python3 && sudo apt install python3-pipInstall the Linode CLI using pip3:
sudo pip3 install linode-cli
CentOS/RHEL Stream and Fedora
Ensure that all available packages are up to date:
dnf upgradeInstall python3 and pip3:
sudo dnf install python3 && sudo dnf install python3-pipInstall the Linode CLI using pip3:
sudo pip3 install linode-cli
CentOS 7
Ensure that all available packages are up to date:
sudo yum updateInstall python3 and pip3:
sudo yum install python3 && sudo yum install python3-pipInstall the Linode CLI using pip3:
sudo pip3 install linode-cli
Windows 10
Download the latest stable Windows package for python3 for your system at Python’s Downloads Page.
Open up the installer
.exeto begin the python installation process using Window’s GUI.Before proceeding, ensure that your version of Python is added to PATH by checking the box which enables this option:

Select the Customize Installation option to proceed.
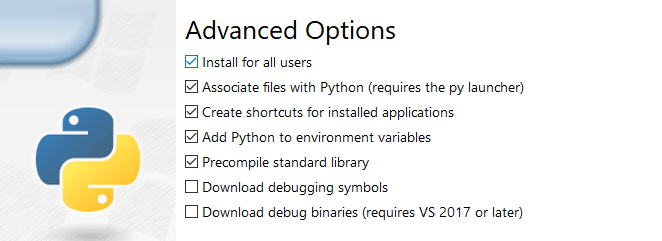
Ensure that
pipall desired optional features are selected before proceeding to the next step. Thepipinstallation is required by the Linode CLI.In the next step, ensure that the Install for all users option is enabled. Your configuration should reflect the following:

Select
Nextto proceed with the installation. Once the installation is complete, a message will confirm Python3 was successfully installed will appear that can be safely closed.Open the windows command prompt and enter the following command to complete installation of the Linode CLI:
pip3 install linode-cli
Mac OSx
By default, python3 should already be installed and configured on the latest versions of Mac OSx. If for whatever reason it is not, you can use brew to install python3 which will additionally include pip:
brew install python3Next Steps
To confirm the Linode CLI has successfully been installed, the following command may be entered:
linode-cli --versionIf your installation was successful, the latest version of Linode CLI will be outputted.
Once the Linode CLI is installed, no further steps should be needed for configuration as both python based versions of the CLI will use a configuration file that will persist between the change. If for whatever reason you need to reconfigure the Linode CLI, the following command may be entered:
linode-cli configureFor more information on how to use the Linode CLI, see our Overview Guide
More Information
You may wish to consult the following resources for additional information on this topic. While these are provided in the hope that they will be useful, please note that we cannot vouch for the accuracy or timeliness of externally hosted materials.
This page was originally published on
