Setting Up a Streaming RTMP Server
Traducciones al EspañolEstamos traduciendo nuestros guías y tutoriales al Español. Es posible que usted esté viendo una traducción generada automáticamente. Estamos trabajando con traductores profesionales para verificar las traducciones de nuestro sitio web. Este proyecto es un trabajo en curso.
Live streaming has become an important way for creators, gamers, instructors, and media personalities to reach new audiences. Many live streamers are using sites such as Twitch and Facebook Live to stream. However, a Real-Time Messaging Protocol (RTMP) Streaming Server is another popular way to distribute live streams. RTMP allows you to send your stream to a central server, which can store it or retransmit it for audience playback.
This guide discusses how to configure an RTMP streaming server, and how to use open-source software to broadcast and connect to a stream. It also explains how to set up multi-streaming to transmit a live stream simultaneously to several social media sites.
Before You Begin
If you have not already done so, create a Linode account and Compute Instance. See our Getting Started with Linode and Creating a Compute Instance guides.
Follow our Setting Up and Securing a Compute Instance guide to update your system. You may also wish to set the timezone, configure your hostname, create a limited user account, and harden SSH access.
sudo. If you’re not familiar with the sudo command, see the
Linux Users and Groups guide.More Information About RTMP
RTMP is a networking protocol, not an application. It uses the Transmission Control Protocol (TCP) layer, so most media servers can process it. RTMP was originally a proprietary technology belonging to Adobe and was designed for high-performance transmission of audio, video, and data. However, it is now available for free public use and is currently one of the most popular streaming formats. Most encoders can transmit RTMP, and the large media sites accept it, but browser support can be patchy. We recommend you to use a dedicated media player such as the free open-source VLC Media Player to receive streams.
If you want to learn more about the technical details behind RTMP, you can find out more on the Adobe development site. The Wikipedia page also provides a good introduction.
Advantages of Using an RTMP Streaming Server
RTMP is a robust protocol offering low-latency, persistent connections, and reliable transmission. Streams are split into fragments, with the size negotiated between the client and the streaming server. Different streams can be multiplexed over the same connection. It is fairly easy to set up and use RTMP, but you must use RTMP-compatible software to transmit your stream to the server.
Using an RTMP server also allows you to implement multi-streaming, which reduces the amount of bandwidth used on your local connection. You only transmit one copy of your stream to the server, even if you want to stream to multiple platforms. RTMP takes care of forwarding copies of your stream to as many sites as you want. This makes it easy and convenient to simultaneously live stream to YouTube, Facebook, and Twitch at the same time. However, for some sites, you must transcode the stream into a particular format by altering or recompressing your stream.
System Requirements
An RTMP streaming server does not necessarily require much processing power or memory. For a single stream, a Linode 1GB solution should suffice. If you are retransmitting to several sites or have to convert a stream into a different format, you might require a more powerful solution. In this case, we recommend a host with at least 4GB of memory, such as a Linode 4GB solution.
A Summary of the RTMP Streaming Server Configuration Process
These installation instructions are geared for Ubuntu 20.04, but the procedure is similar on most Linux distributions. RTMP is a protocol rather than an application, so you do not have to install it. To make use of RTMP, you must install a web server, such as NGINX, and perform several other configuration steps. The following sections describe each step in more detail.
- Install NGINX and Related Components
- Configure NGINX to Support RTMP
- Configure and Use the Open Broadcaster Software (OBS) Client
- View and Test the Stream
- Set Up and Test Multi-streaming
Install NGINX and Related Components
NGINX features full RTMP support and we recommend it as your RTMP streaming server. Follow these steps to install NGINX.
Upgrade your host with the latest package updates.
 sudo apt update
 sudo apt upgrade
Install the NGINX server, RTMP support, and other related modules.
sudo apt install build-essential libpcre3 libpcre3-dev libssl-dev nginx-full libnginx-mod-rtmp ffmpegVerify the status of the server.
systemctl status nginx.serviceAfter installation,
Systemctlreturns a status ofactive.nginx.service - A high performance web server and a reverse proxy server Loaded: loaded (/lib/systemd/system/nginx.service; enabled; vendor preset: enabled) Active: active (running) since Sun 2021-02-14 15:21:39 UTC; 41s ago
Configure NGINX to Support RTMP
To stream, you must configure some server parameters through the nginx.conf file and create a stream application. This section explains how to configure RTMP to accept a stream and make it available for viewing. Multi-streaming is discussed in a later section.
Use your favorite text editor and open the NGINX configuration file, typically located at
/etc/nginx/nginx.conf.sudo vi /etc/nginx/nginx.confNote If you cannot find thenginx.conffile, run the commandsudo nginx -t. It displays the file’s location and validates its syntax.Add some RTMP configuration to the end of the
nginx.conffile as shown in this example.- The
chunk_sizesetting configures the fragment size. The optimal size varies depending on the server, but4096is a reasonable default value. - The default port for the
listenvariable is1935. - Within the server configuration, create an application and give it a name. This example uses
livestreamas the application name, but for security reasons, we recommend you choose a more distinctive name. You must setlivetoonto enable streaming. - If you want to save a copy of your streams, set the
recordvariable toall. Otherwise, set it tonone. - If you set
recordtoall, you must configure a value forrecord_path. This is where the recordings of your streams are saved. - We recommend adding an authentication method so your streams cannot be hijacked. Defining a location for
on_publishhere allows you to enable password validation in a subsequent step.
- File: /etc/nginx/nginx.conf
 1
 2
 3
 4
 5
 6
 7
 8
 9
10
11
12
13
14
15
16
17
18
19
20
... rtmp { server { listen 1935; chunk_size 4096; notify_method get; application livestream { live on; on_publish http://localhost/auth; #Set this to "record off" if you don't want to save a copy of your broadcasts record all; #The directory in which the recordings will be stored record_path /var/www/html/streams; record_unique on; } } }
- The
Create a directory to save your streams. The directory location should match the value of
record_path.sudo mkdir -p /var/www/html/streamsSet the permissions for the new directory so the server can write to it.
sudo chown -R www-data:www-data /var/www/html/streams/If you intend to enforce authentication for inbound streams, open the
/etc/nginx/sites-enabled/defaultfile and add the following information inside theserverblock. Replaceyourpasswordwith a more secure password.- If the password you provide when you start your stream matches the password in this file, the streaming server returns an HTML code of
200(“OK”). - If the password is incorrect, it returns a code of
401(“Unauthorized”) and disconnects the session.
- File: /etc/nginx/sites-enabled/default
1
2
3
4
5
6
7
8
9
... listen 8080; location /auth { if ($arg_pwd = 'yourpassword') { return 200; } return 401; }
- If the password you provide when you start your stream matches the password in this file, the streaming server returns an HTML code of
Restart the server to apply your changes.
systemctl restart nginx.serviceReview the server status to ensure it is still running. Look for the status of
active.systemctl status nginx.service
You can find more detailed examples of NGINX configurations for RTMP on the NGINX GitHub page.
You can force viewers to authenticate before watching a stream with the on_play variable, which works the same way as on_publish. For extra security, you can remove the html configuration from this file if you are not planning to use NGINX as a web server. Ensure you do not delete the events configuration block while doing so.
Configure and Use the Open Broadcaster Software (OBS) Client
Streamers typically use either a commercial web-based streaming service or an application on their computer. To stream to your RTMP server, we recommend the Open Broadcaster Software (OBS). OBS is a free open-source broadcasting application that is flexible and straightforward to use. It is available for most common operating systems including Ubuntu.
Go to the OBS website and choose the appropriate download for your system. This software should be installed on your computer and not on the RTMP streaming server.
Open the application and look for the
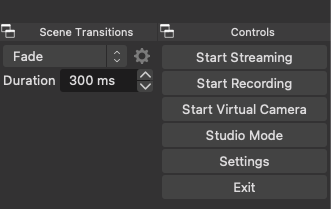
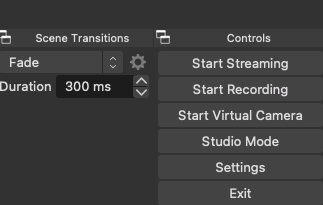
Controlsmenu in the lower right part of the application window. Click the Settings button.
When the Settings window appears, click Stream on the left-hand panel, and enter the following information about your stream:
Service:CustomServer:rtmp://<yourserverIP>/<RTMP_application>.- Replace
yourserverIPwith the actual IP address of your streaming server. - Replace
RTMP_applicationwith the name you chose for your application in the RTMP configuration block. In the earlier example, we used the namelivestream.
- Replace
Stream Key:<your_stream_name?pwd=yourpassword>.your_stream_namecan be any name you want to identify the stream.yourpasswordis the password you configured in/etc/nginx/sites-enabled/default.
- Click OK.

To begin streaming, click on the Start Streaming button in the lower right of the application in the
Controlssection.
Note A quick way to test your stream is with a scrolling text message. Click the + button under thesourcesmenu to create a text object. When you have created the object, right-click on the source and select filter to apply a scrolling effect. See the OBS Wiki for more information.If you are recording your streams, you can easily confirm whether the server is accepting the streamed input or not. Navigate to the
record_pathdirectory (from your RTMP configuration), and list its contents with thelscommand. If you see a new file, the streaming server is correctly receiving and saving your stream.cd /var/www/html/streams lsNote Streaming at too high a rate could cause OBS to disconnect from the server. If your connection bounces, click Settings and then select Output. Set theVideo Bitrateto a lower value. OBS provides some helpful debugging tips on the OBS GitHub page.
View and Test the Stream
You are now ready to connect to and view your stream in a multimedia player. We recommend the open-source VLC Video Player because it is simple, free, has good performance, and runs on all platforms. These instructions and the associated screenshots are for an Apple desktop, but the process is similar for other operating systems.
Navigate to the VideoLAN site and download the VLC software for your operating system.
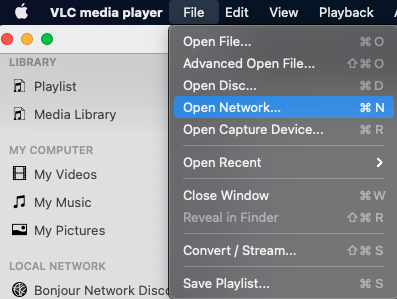
Click on the File menu and select Open Network.

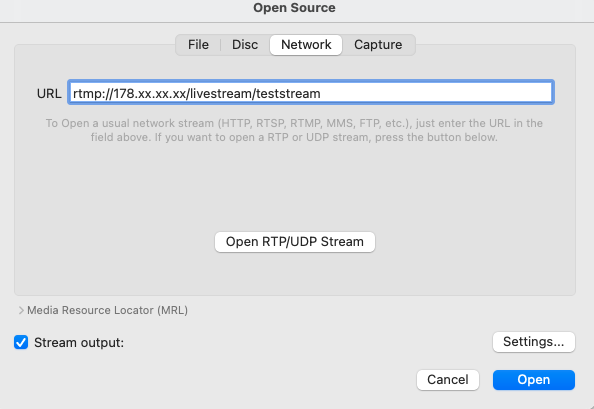
This displays the “Open Source” dialogue box. In the
URLfield, enter your stream information in the format ofrtmp://<yourserverIP>/<RTMPApplication>/<your_stream_name>. ReplaceyourserverIPwith the actual IP of your streaming server andRTMPApplicationwith the name of the stream application from the server configuration file. The value foryour_stream_namemust match the stream name from OBS. Finally, check theStream outputbox.
Set Up and Test Multi-Streaming
RTMP is particularly a good choice for streaming to multiple sites at once because it efficiently saves bandwidth. Instead of having to broadcast a separate stream to each channel, you can send one stream to the RTMP streaming server. The server then handles the redistribution of streams, sending one copy to each endpoint. You can enable multi-streaming in your RTMP configuration with a push entry for each destination. To set up multi-streaming, follow the below procedure:
Open the
/etc/nginx/nginx.conffile for editing.sudo vi /etc/nginx/nginx.confLocate the ingest information for the service you want to stream to. For example, Twitch provides a list of all of its ingest points. Find the ingest point closest to you and take note of its ingest URL. For YouTube, you can find the ingest server URL on your YouTube Studio page. Consult the documentation for your streaming service for more detailed information.
Add a push notification for each service to the stream application block within the RTMP configuration. The configuration must be in the format
push rtmp://<streaming_service_ingest_url>/<stream_key>;. Thestreaming_service_ingest_urlis the ingest URL you located in the previous step. Each streaming service provides a way for you to determine your privatestream_key. In Twitch, you can find your stream key from your dashboard, while in YouTube, it is in the same place you found the ingest server URL. This example illustrates the configuration to push to Twitch’s London ingest server.- File: /etc/nginx/nginx.conf
 1
 2
 3
 4
 5
 6
 7
 8
 9
10
11
... rtmp { server { ... application livestream { ... push rtmp://lhr04.contribute.live-video.net/app/<stream_key>; } } }
Add additional
pushentries for the other sites you are streaming to.Restart the server to apply your changes.
systemctl restart nginx.serviceStart your stream again. You can now view it on the streaming site of your choice.
(Optional) For enhanced security and more granular control, you can create an application for each streaming service and call it from the main application. This technique gives you the ability to override the
livestreamsettings and turn off recording for some services. Edit eachpushnotification in yourlivestreamapplication to push to the new application.In the example above:
- Change the push configuration for Twitch to
push rtmp://localhost/twitch;. - Add the configuration for
application twitchas shown below. - Restart the server and your stream once you are done to verify that your changes are correct.
- File: /etc/nginx/nginx.conf
 1
 2
 3
 4
 5
 6
 7
 8
 9
10
11
12
13
14
15
16
17
18
... rtmp { server { ... application livestream { ... push rtmp://localhost/twitch; } application twitch { live on; record off; allow publish 127.0.0.1; deny publish all; push rtmp://lhr04.contribute.live-video.net/app/<stream_key>; } } }
- Change the push configuration for Twitch to
Ingest servers can change without notice. We recommend you review the specifications for your streaming service regularly. Some streaming services, such as Facebook Live, require you to transcode your stream into their particular format. You can accomplish this using the FFmpeg library.
See the NGINX GitHub page for a sample configuration.
More Information
You may wish to consult the following resources for additional information on this topic. While these are provided in the hope that they will be useful, please note that we cannot vouch for the accuracy or timeliness of externally hosted materials.
This page was originally published on
